SOMEWHAT ANAL RETENTIVE MAKEUP TIPS
This is less detailed than the costume section; stage makeup is harder to describe than costumes, and I find it harder to pick up. I hope people will find this helpful anyway.
If you want to send in suggestions, please do--but I won't post specific names or catalog numbers for street makeup (Revlon, Maybelline, etc.). They just change too fast to keep updated. More info can be found on the links page
.
Last updated: 4/2/2016
Most people start with street makeup, which is fine. I like stage makeup.
It doesn't change colors every season and it's designed for what we do--being a specific color, staying put, and looking good under hot lights while the wearer jumps around. Stage makeup can be found in magic and theatrical shops and offers some options street makeup doesn't. It's more expensive than the cheap stuff, and if you aren't near a good source, you have minimum orders and shipping to deal with
When using nontheatrical makeup, I have (mostly) sworn off the cheap stuff. Try a few brands and see what works for you. e.l.f. (Target) is good, and I've had good luck at Sally's Beauty Supply, especially their Beautique eyepencils, which are reasonably dark, easy on your eyelids, and keep a fairly good point. Sadly, their nail polish is crap.
I don't recommend using Halloween makeup (sold at Spirit, sometimes also at costume shops). If it's locked in a glass case, it's good. If it's in a blister pack, probably not. I know people who can apply the water-based white-in-a-tube evenly without streaking, but I sure can't.
Everyone should buy their own makeup, boys too. It's's easier and more hygienic. People who don't usually wear makeup may need help applying it at first. I keep my Rocky and non-Rocky makeup separate so if I need something at the show I know it will be in my bag.
The makeup that works for you will depend on your skin color / tone and the lighting setup at your theater.
The makeup plans here are geared primarily towards Caucasian performers because all the main characters in the film, which is my basis, are Caucasian. Adjust the makeup as needed depending on your skin color: if your skin is chocolate brown, Riff's pallor for you might be ashen brown, not whiteface. If you're playing Columbia and you're swarthy, you'll wear paler foundation than an Irish blonde.
Miscellaneous Tips:
Some Personal Recommendations:My Personal Recommendations page
has thoughts on various makeup brands. They're slanted towards Magenta because that's who I play.
MAKEUP BY CHARACTER:
You can find video instructions on doing Rocky makeup for most of the characters on YouTube. Quality is variable - but if the person giving the tutorial doesn't look like you want to look, keep looking.
If you want to buy makeup from a Rocky fan who's puzzled out the colors (don't just blindly accept her choices; do your own research!) and you like Mary Kay, check out the links page and go to Makeup.
FRANK:
-
Click here for a simplified, generalized makeup plan for Frank (many thanks to Kelly McKivor).
- If you want makeup scene by scene instead, we suggest you get out your DVD and go frame by frame.
- You can take a look at a few makeup pictures here.
- I recommend Jen DiMatteo's Frank makeup tutorial at http://www.youtube.com/watch?v=CeorOGR_z4k&feature=youtu.be&a. She goes over the contouring/highlighting in detail, and has some good tips for what to look for when you use a reference photo.
Frank Sweet T:
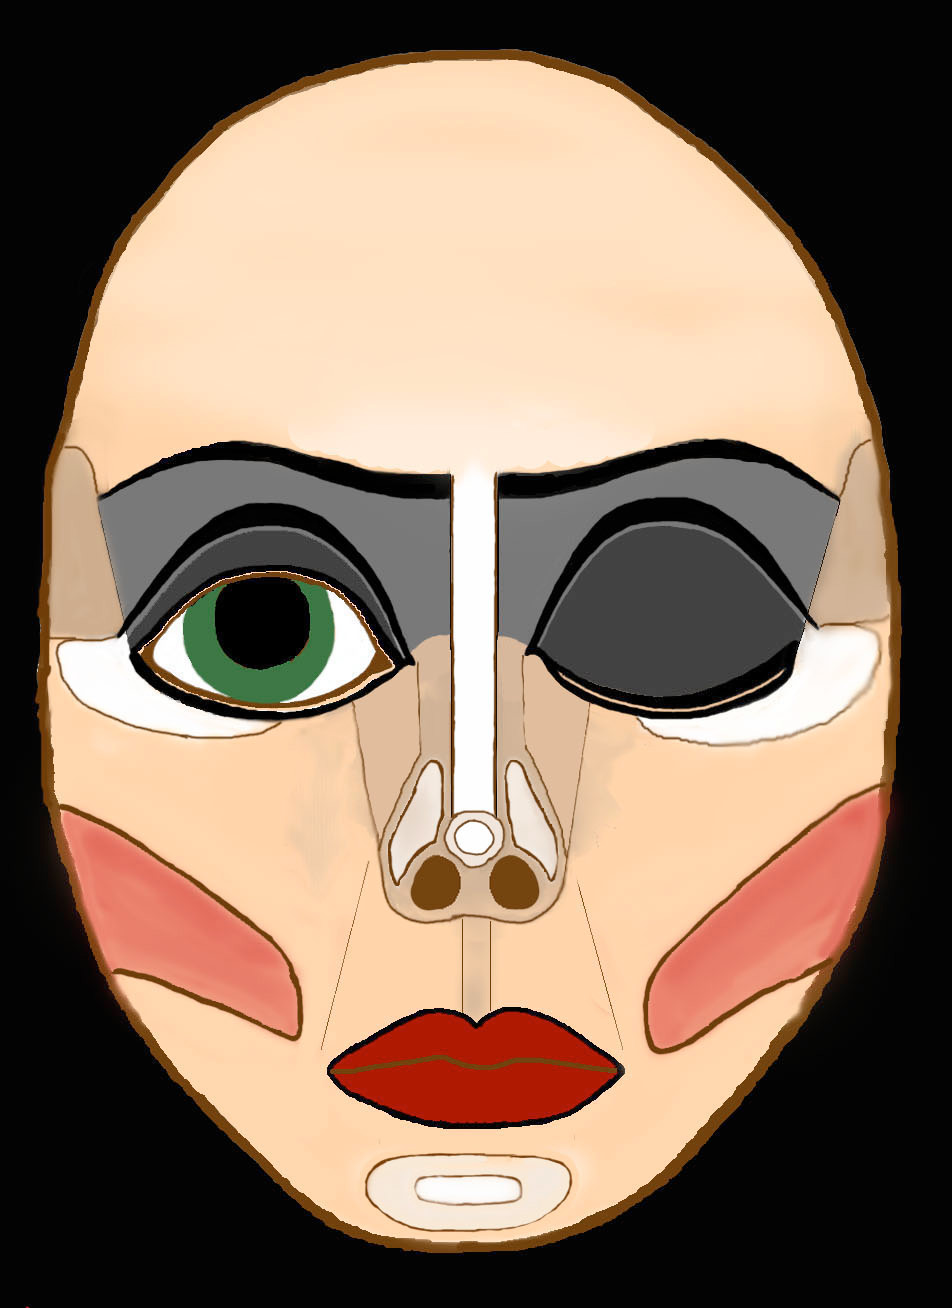
- Very light foundation.
- Do not overwhite, and do not apply below the jawbone or chin. (It will weaken your jawline.) When Tim turns his head, you can (usually!) see that either he stopped his foundation right at the jawline or applied darker foundation beneath the jawline to bring out the line of the jaw.
- Frank has white highlights on his chin, over the cheekbones, down the bridge of his nose, on the tip of his nose, and under the corners of his eyes. The
under-the-eyes highlight is especially important to the overall look. It looks like there is white highlighting above his mouth, too, in some scenes at least. Try to use a slightly shimmery white for the highlights instead
of a flat one.
-
Dark gray/black eyeshadow. Black eyepencil. Liquid eyeliner (optional), black mascara (optional)
- Bring eyeshadow up to
and over brows. Then shade in extra dark over the lid and just over the crease. Tim's bone structure is such that there is a shadow from the inner corner of the eye to 2/3
of the way along the eyebrow. (Tim didn't wear shading there, but most people need makeup to get the effect.)
- Draw in THIN brows at the top of your own brows and just a tad longer. Arc them up just a little bit right at the bridge of the nose. Do not round them (you'll look like a clown); make them angular, and don't make them too thick! Your eyeshadow should be enough lighter than your eyepencil that your eyebrows don't look thick. Bring eyeshadow lightly down in a straight line from inner corners of the brows. If you contour your nose, the nose contouring follows the same straight line as the eyeshadow.
- Line eyes, top AND bottom. Don't be subtle lining under them! Eyeliner must be DARK. Liquid eyeliner or a grease pencil (buy at a theatrical shop) may work best.
- Black mascara. Unless you have killer lashes, you need it, and itwill open your eyes up and make them sexier. You may want to cover your cheek with a tissue as you apply it to keep from getting black specks on your beautiful makeup.
- Deep red/black lipstick.
- The color varies. The color he uses most has a lot of black in it; it's not a pure red, and is more a brick red than a clear red.
You will probably have to create the color by mixing a purplish or black lipstick/pencil with red lipstick. Tim wears a lot of gloss over the lipstick during Sweet T and dinner scene; in other non-Floor Show scenes it's much less glossy.
- Draw in lips, bigger than your own if needed, with black pencil; fill in.
- Orangeish/brown blusher.
- Contour your nose with eyeshadow (or use a pencil, then smear it--easier to get straight). Blend. Also shadow
under your lips to make them look pouty (Tim did), and brush some on your temples. Frank's blusher and contour are about the same color. It's amazing what a huge difference the contouring makes; please don't skip it.
- Follow cheekbones in a straight line most of the way down to the corners of your lips. Blend into a triangle with flat side at sides of face, tip pointing to lip corners. PLEASE BLEND and don't use too dark a blusher or you will look utterly ridiculous.
- Draw wide sideburns with black eyepencil - particularly you ladies. You can also grow your own (probably not the ladies) or buy sideburns at a theatrical shop--don't forget adhesive.
- They're essential to the look.
- Tattoos: Green eyepencil, red lip pencil, black eyepencil.
- Revlon used to make a cloudy-clear liquid that you could brush over pencil
makeup to make your own temporary tattoos. Look for it near their
"Street Wear" line of nail polishes (in oval, not round, nail-polish
style bottles). Heaven only knows if they still make this...You can also get kits to make your own
temporary tattoos. They are sold in shops and catalogs specializing
in costumes, lingerie, and fetish wear.
- Or buy one from Deadly Sting (check the Links page) or try Sharpie markers. Baby wipes will remove (most) of the Sharpie ink.
Sharpies bleed a little but smudge less than pencil and stay on under clothes.
- Black "4711" is on right thigh on the
outside of Frank's front garterbelt strap.
The numbers are dashed, not solid. The "4" is a closed 4, the 7 is
crossed, and the 1's have little tops (serif).
- Boss tattoo is on right upper arm. The word "BOSS" is written in black script letters above a red heart pierced by a green knife. Two drops of blood drip
below the right side of the heart, and one drop below the tip of the
knife. Heart, dagger and drops of blood are all outlined in black.
The heart has lighter shading in the middle. The
knife handle is on the upper
right of the heart (guard is shaped like a backwards "S") and the top
of the handle isn't colored in. The knife tip
comes out the bottom left of the heart.
Frank Floor Show:
Amazingly enough, some Franks have time not only to change costume but
to apply additional lipstick and eyeshadow for this scene.
- Lighter foundation.
- No bare skin shows. There is
very little contouring and his rouge is very restrained.
- Frosty blue eyeshadow.
- Preferably cream, though a creamy pencil would do. Worn on
eyelids only; outlined at the eyelid crease in smudgy black. Apply
over gray eyeshadow if you have time. There is darker shading in gray from the inner corner of the eye to 2/3 of the way along the eyebrow. Smear blue on left chest for "smurf come" after you leave the pool.
- Red powder blusher.
- Red lipstick.
- Frank's lipstick is not outlined in black for this scene,
and is much redder and glossier.
JANET:
Makeup pictures are here.
- Copper brown eyeshadow and brown eyepencil.
- The eyeshadow is applied lightly but over a generous area, covering more than just the orbits of the eyes to the sides, but not all the way up to the eyebrows. Don't completely line your eyes or they'll look smaller. Janet lines her top eyelid completely with a fairly heavy line, but it looks like the lower inner eyelid corner is left unlined. To make eyes look bigger, outline outer 2/3 of the bottom of eye, drawing line 1/16" lower than your eye at the middle, arcing down to 1/8" lower than eye at the outer corner.
- Brown mascara.
- Janet wears a lot.
- Light pink lipstick (glossy).
- Terracotta rouge.
- Sort of an orange-pink. It's lightly applied in a rectangular shape instead of the usual triangle.
- Janet either wears clear nailpolish or buffs her nails; there's a definite shine to them (check during "Dammit Janet").
Janet Floor Show:
- Wide blue-green pencil; red lipstick; black pencil.
- Draw green line around face, put along lids
smeared up and over brows, and apply red lipstick to lips.
- Draw black beauty mark above the left corner of her lips.
- White.
- Janet's face is whited inside the line, but you probably won't have time unless a different person does the previous scene.
- Purple eyeliner under eyes.
- Blue nailpolish.
BRAD:
None til floor show. Draw in sideburns with a black eyepencil
if you need to.
Brad Floor Show:
- Red lipstick, red lip pencil. White.
- Color eyes and lips as described for Janet's floor show (no beauty mark). Brad wears red under-eyeliner.
- Red nailpolish.
RIFF:
Click here for a simplified, generalized makeup plan for Riff (many thanks to Melanie La France). You can find makeup photos here.
- Light foundation.
- You can also mix a little flesh tone makeup with clown white to get a less ghostly shade. Use only if your skin tone is dark. Many Riffs wear too much white. Don't. One of the best-looking Riffs I know used no white at all and did his face completely in skin tones and browns. A little white applied to the center of the forehead will make it protrude nicely. If your nose is not as long and straight as Richard's, a strip of highlighting right down the center of the nose may help too.
- Black/brown pencil.
- Use to emphasize brows. Richard's are surprisingly dark and pronounced, and they help define the eyesocket. The shape is more straight than anything else. Ladies, take note: delicate eyebrows look silly on Riff. Square off the ends a little and make them thicker for a more masculine look.
- Brown/pink powder.
- (Sometimes it looks more pink; sometimes it looks more brown.) Probably blusher is easiest (it's what it's designed for). Use to emphasize all the hollows in your face--cheeks and eyes are most crucial. A little powder in a horizontal
line just below the lower lip will help the bottom lip protrude (visible on Ritz: this trick will also make a woman look more masculine); there is also a slight cleft in the chin.
-
Brush brown along both sides of your nose (Riff's is very straight)
and on the temples along the edges of your forehead to make it bulge a little. Dust powder along the hollows in your neck on either side of the voice box. Women may want to sketch in an Adam's apple.
- Shiny pink makeup.
- In some scenes Riff's eyes are hollowed with some sort of pink makeup. Most pink eyeshadows seem to have a sparkle to them and are not recommended; it looks odd. You want a creamy shine, not a powdery sparkle. You want either a cream shadow or blusher, or possibly a lipstick. You can use red if you're very careful not to use too much and willing to really rub it in to your eyesockets (ouch). Don't be too subtle, either; the pink is quite pronounced.
- Skin-tone makeup stick.
- Use on lips to counteract natural pink color (Richard did). Powder or your lips will be showing through by Dinner Scene. Please don't color your lips black; the photo you're copying is an out-take. Riff's lips are never black in the film.
- Fake blood.
- Riff has blood on his hands when he answers the door and at dinner. There is also blood on his chest at dinner.
MAGENTA:
Click here for a simplified, generalized makeup plan for Magenta (many thanks to Melanie La France). You can find makeup photos here.
- White or very light foundation.
- White your face (not too much). I have used Cover Girl Palest Ivory--and stage makeup: clown white (Kryolan), Ben Nye's Porcelain, Special White, Fairest, and Alabaster. Use what looks good on you (the Porcelain and Geisha are definitely too pink on me.)
- Dark eyepencil.
- Pencil in your brows.
- It looks to me as if Magenta's brows are brown during the Time Warp, but black during the Takeover scene. If you have to pick one color, I think black works better. Her brows are mostly horizontal, with a little arch to them, and fairly long.
- Purple eyeshadow, brown eyeshadow, and a purple eyepencil.
- Outlining the shadow shape with pencil makes getting the shape right a lot easier, and an outline can be seen on Magenta in several scenes.
- Draw light purple half moons which extend above your eye crease, leaving some space between the brow and the top of the half moons. The edge of the half moon should be just a little further than the outer corner of your eye. Fill in with purple shadow down to the eyecrease. Fill in up to the eyecrease (and a little beyond) with the brown eyeshadow. The brown should barely show when your eyes are open.
- Black eyepencil or liquid eyeliner.
- Line eyes heavily (Magenta's eyeliner goes nearly all the way up to her eyecrease). Line above and below lower lashes or it won't be dark enough. If you don't wear fake lower lashes (and maybe even if you do), draw some in.
- I love Mehron's Pro-Pencil Slim in Absolutely Black. It WILL NOT WORK on the lower lashes; it smudges and makes my lower lashes come unglued, but it looks beautiful on the upper lid and makes it easier to remove the top lashes. I like liquid or gel eyeliner. It goes on dark but doesn't screw up my eyelash glue.
- Black mascara.
- I apply to both top and underside of my top and bottom lashes, and again after applying false lashes to help stick them to my real lashes.
- White lipstick.
- Fill in the space between the shadow and the brow with this. This can be done with clown white or a pencil, but is much easier with white lipstick and is easier to apply evenly. (If you are going to use clown white here, apply it FIRST and then apply the other eyeshadows under it.) I haven't seen white lipstick sold in stores for a while; costume shops carry it.
- Fake lashes and glue.
- These are not optional; they make the look. If lash strip is too long, trim it (just a few hairs at a time) or the strip will poke you in the eye. Use clear glue, not black, so if you make a mistake it won't show. Baby oil will remove any extra eyelash glue, but will also ruin any makeup it touches. When you buy eyelash glue, buy the kind in a tube, not a bottle. I have no clue how to apply the kind in a bottle--it doesn't come with a brush. WARNING: almost all eyelash glue contains latex, so if you are allergic, read the label. (You can buy non-latex eyelash glue, though it's fairly rare; see the links page.)
- Apply glue lightly to lashes. I apply it straight from the tube; you can use a toothpick if you like. Before applying lashes, give glue 30 seconds to get tacky. Flex the lashes a little to give them the curved shape they'll have to take on glued to your lids. Apply carefully as close to your natural lashes as possible, starting at the inner corner of your eye and working your way to the outer corner, tamping the lashes down with your fingertips. (I use the back side of my fingertips--the nail--because the glue won't stick to nailpolish as easily as to skin.) If you get any glue on your fingers, remove it or you will get glue everywhere. Reposition lashes only if you absolutely must. They are harder to position correctly the second time, and the excess glue tends to glue your eyelids open. (If this happens, try applying more eyeshadow (powder-style) over the offending glue.) Do not glue lashes too close to the inner corner of your eye or they tend to work their way loose.
Once glue is dry, stick fake lashes to real ones with a coat or two of mascara. Always take your eyelash tray and extra glue to the theater with you in case lashes start to come off. If I don't put the lashes in an eyelash tray when I take them off, they're usually ruined (especially the lower lashes).
- "Undie lashes" can be bought at beauty supply stores. They usually aren't long enough for Magenta, but are easier to apply than regular lashes turned upside down (which look great). You may be able to order longer undie-lashes (try asking for "showgirl" length) at a costume shop. I did, but they weren't long enough either...Individual lashes may be glued on if you are very patient. Pat Quinn used strip lashes.
- I like to remove extra glue from my natural lashes with a Q-tip dipped in baby / mineral oil. It works very well and is easy on the eyes. Mineral oil can give you styes so use with caution, but nothing else works as well.
- Glossy red lipstick.
- Should have some black in it (you don't want the bluish-toned reds--they'll look pink). Emphasize the "M" shape of your upper lip ("cupid's bow").
- Red nail polish.
- Apply long before you put your costume on or long after. You can also use fake nails (but only after your garter belt is on and your makeup is done).
- Miscellaneous Time Warp wig tip: Magenta's hair is layered, shorter at the front (the hair extends down to her cheekbones) and top (to get the correct pyramidal shape).
Space Scene:
- There is a hint of rouge on Magenta's cheeks.
- My experience with white hairspray is it doesn't show up well enough to make good space hair stripes. White cream makeup worked better for me, but makes a mess (careful when you take off your spacesuit!). White hair strips are cheap (about $5 each at a wig shop) and can be "finger waved" to make beautiful space stripes; if you can't afford a wig, bobbypin them onto your own hair.
COLUMBIA:
Click here for a simplified, generalized makeup plan for Columbia (many thanks to Melanie La France, with input from Mina Smith and Saffron Shearer-Gare). You can find makeup photos here.
- White or light foundation (see my warning about white).
- Apply a light coat of white.
Columbia is naturally pale, not cosmetically so. There is a white highlight at the top of the cheekbones, between your eyes and your rouge. During Time Warp, Columbia has white highlighter all the way under her eyes, but it disappears later in the film.
- Cover your eyebrows (foundation or a cover stick under the white may be helpful) or use wax and a latex piece from a costume shop (apply over your brows in the direction the hairs grow). If you want to use wax, options include mortician's wax; or "eyebrow plastic," available from stage makeup suppliers such as Kryolan. (They recommend using a sealer, too, which they also sell. Kryolan sells an "Eyebrow Design Kit" which contains spirit gum, wax, and sealer.) Some costume makeup books recommend soaping out the brows (rub a bar of soap over the brows in direction of hair growth). It does minimize them, but I've never figured out how to put makeup on over the soap. Drag queens use Elmer's glue or a glue stick. Try the kind that goes on purple but dries clear. Some Columbias bleach, shave or pluck their brows. Whatever works for you.
Here are some suggestions for blocking out your eyebrows using spirit gum from Anna from
Lincoln and Jen Hoffman (who learned it in a stage makeup course). When done right, it looks great.
- Clean eyebrows to remove oils using either rubbing alcohol or baby
wipes.
- Brush eyebrows as flat as possible (always in direction of hair growth).
- Use a good coat of spirit gum to stick hair together and flatten
(allow to dry ~3 or 4 min).
- Press on the eyebrows with a WET (not dripping) paper towel to flatten eyebrow hairs as flat as possible (must let dry ~ 5-10 min)
- POWDER! using a good amount of powder (eyeshadow
applicators work better for me... really presses the eyebrows down) and
press INTO the eyebrows. Wait a minute and lightly remove excess with a big blush brush.
DO NOT BE AFRAID TO PUSH POWDER OR BASE INTO EYEBROWS! WE WON'T
BREAK; THERE IS A STRONG BONE UNDER THERE.
- 1st foundation: work base 1 shade lighter than your regular base
into eyebrow (with finger). Use enough, but a light coat...powder
again, then brush. I use a white base for this.
- 2nd foundation: Go over the lighter base with normal color base
and fill in eyebrow. Make sure you powder after each application of
base.
I use 3 different colors... white, pink-toned, and then a really
light ivory.
- Shimmery peach eyeshadow (or lipstick).
- Cover your real brows with the shadow; blending up to the penciled brows.
- While on the video it does look like just Columbia's lids are blue during Time Warp, I've watched her close and open her eyes frame by frame on the DVD, and there is no blue in sight. I think it's a shadow. This is even more easily visible during "Hot Patootie," when she is not wearing her hat.
- Black pencil and mascara; reddish-brown pencil.
- Heavily line
eyes with black and draw a triangle at the upper lid up at the outside corner of the eyes so it looks like you're wearing false lashes (it's not a cat eye but more extreme). Draw in high arched brows with the reddish brown pencil (NOT over your real brows). Keep them thin, and please use an auburn pencil, not lipstick red: you don't want them to look like you drew them with lipstick. To get brows even, it may help to use a cardboard template (flip after doing first brow).
- Columbia has a black beauty mark below the corner of her left eye until Toucha. Shelley Foss recommends making the beauty mark with clear eyelash glue and coloring it with black pencil. Before Toucha, wipe off the eyebrows and eyeshadow. Peel off beauty mark (voilà!). I presume that just using black eyelash glue would also work.
- False eyelashes and glue.
- Top lashes only. See Magenta's makeup section for tips on false eyelashes.
- Red lipstick.
- Fill in lips, emphasizing the M shape of the upper lip ("cupid's bow").
- Red blusher.
- More a pink/purply red than the lipstick. Draw it down in a straight line along your cheekbone. Wipe the blusher off before Toucha if you have time.
- Red nail polish.
Touch Toucha:
Columbia wipes off her rouge, eyebrows, and her beauty mark before Toucha Toucha.
Columbia Floor Show:
- Purple pencil or lipstick and red lipstick. White.
- Draw purple line around face, put purple along lids smeared up and over brows, and apply red lipstick. Line under eyes with purple. Columbia's face is whited inside the line, but you probably won't have enough time.
- Metallic purple nailpolish.
ROCKY:
Rocky Floor Show:
- Red and blue lipstick. Blue eyeliner. White.
- The outline around Rocky's face and his eye makeup are blue. His lower eyelids are
also lined in blue. His lipstick is red. See Columbia's floor show
makeup for details.
- Blue nailpolish.
EDDIE:
- Pink/purple eyeshadow.
- Swab around your left eye, especially under it.
- Black and red pencils.
- Draw wide sideburns (or buy at theatrical shop; don't
forget adhesive).
- Draw forehead scar, making small stitches with black pencil in the middle of the scar. Yes, I think there are stitches; here's why. Scar drips down from Eddie's left side. Fake
blood from a theatrical
shop looks great. For God's sake, don't use lipstick to draw your scar; you look like a dumbass.
- Wax or latex to build up scar
(optional, but looks great).
-
Genghis (formerly with the Nuart and Rialto casts) writes:
I would use collodian, which is used to make theatrical scars.
When you apply it to your skin, it dries and
separates the skin just a bit, creating a "canyon" effect, giving the
impression of a scar. After about
5 or 6 coats of collodian, (making a big dent-like crevice) I would let it
dry, while applying my other facial makeup. After the collodian was dry,
I would trace along the scar with the red pencil. I avoided the fake
blood, because like Meat Loaf, I would sweat a lot, and it would get into
my eyes.... The only problem with
collodian is that it's illegal in most
states, since some people purchase it to inhale the strong vapors
(it's like fingernail polish). You might have to be over 18 to
purchase it, so the parental units might have to be involved.
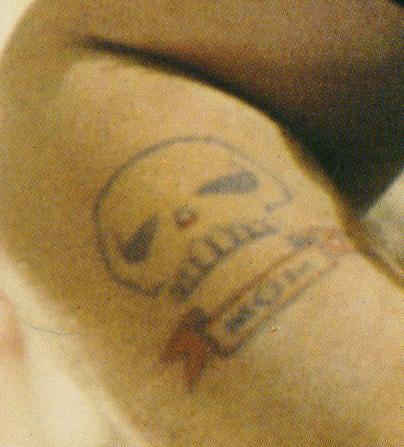
Tattoos:
- Right forearm: look
here. With black pencil, draw a skull without lower jaw on the right forearm. Black in the eyes; draw a hollow triangle for the nose. Centered underneath, outline in black and red a flapping
banner with notched edges. The two ends should ripple so the banner overlaps itself. Color the two ends red. "MOM" is written in black in the center.
- Right hand (thin navy blue--think ballpoint pen ink): Write LOVE upside down on
fingers above the knuckles.
- Left hand (thin navy blue): Write HATE on fingers as
above.
DR. SCOTT:
- Brown eyepencil for mustache. Or buy from a theatrical shop (don't forget adhesive).
- Many Dr. Scotts white their hair. I'm still trying to figure out why as his hair isn't gray...
CRIM:
- Brown eyepencil.
- Put in "diabolical chicken" wrinkles on your forehead and a chin cleft. Put in frown lines and eye bags.
- White hairspray (buy at a beauty supply store or at Halloween)
The following (slightly edited) comments are from Zenin, who won the
Crim division of the costume contest at the 20th anniversary:
Ben Nye makes a great old age starter kit for something around $20. It's got almost all the
makeup one needs and pretty decent instuctions.
Throw away the gray hair stuff they give you though, it's useless
for stage (for film it's ok, but you really have to know how to use
it). Instead, get yourself the biggest bottle of Ben Nye "snow
white" you can find. It's great stuff. By far the cheapest way to gray your hair, and it looks the best once you've had some practice.
That's the hard part though, it takes more skill to use than hair
spray white. Put it on first, and then use it to help hold your
hair in place when you style it. Have a water spray bottle nearby
in case it sets too fast. Spray the whole thing down with hair spray
once you're done.
Do the dark shadow before you do the light, even if the instructions
tell you otherwise.
Use thin lines when using the darker eye shadow and blend them
out. Wrinkle each part of your face as you use it and let your
natural cracks be your guide by running your thin brush down the
center of them and maybe a little (1/4") beyond.
For the light shadow, use a large brush and while wrinkling your
face again run it over the tops of your wrinkles. Don't worry too
much about the light as it mostly blends in too much to be noticed
anyway. Your real shaping power is still in the dark shadow.
Remember, light normally comes from above. Shade the undersides more
then the tops of wrinkles and other features. If it helps, put a
desk lamp in front of you at a 45 degree angle over your head and
look at the shadows for a guide.
And practice! Old age, at least good old age, makeup is one of the
hardest to do well. Don't worry so much about what it looks like
up close; remember you are on stage. Step back at least
five or so feet from the mirror when judging it. Overdo the depth
of the wrinkles as they will look much milder from the house.
If you are in a show with good lighting (non-flashlight,
pro spot light or better) then this goes double as all your work
will just be washed out otherwise. A bright light can make a 70
year old man look 12. I once was a lighting designer for a living;
trust me, I know this from experience. If the light comes from
directly in front of you (eg, most spot lights at Rocky) then this
is even more important.
